Description
The Edit Shape command provides tools to quickly change the shape of source type shapes. Only source type shapes can be edited
via this command. For more on creating all shape types, refer to Create, Draw Shapes. A single
source type shape must be selected for this command to be available.
Select Edit, Shape. The Edit Shapes panel
opens with the source's original Shape Type selected.
Use the Edit Shapes panel to change the shape of an existing source type shape.
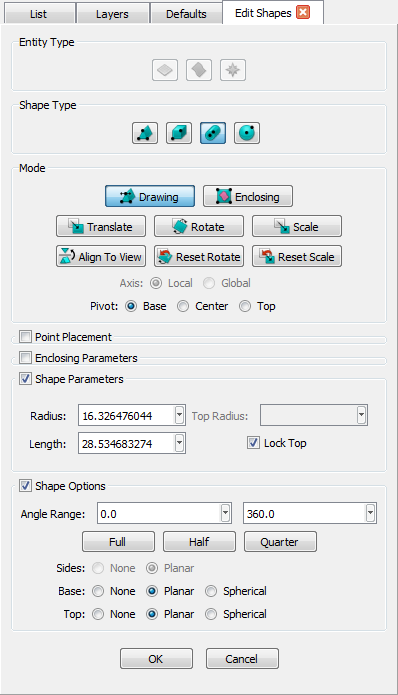
Entity Type Frame
At the top of the Edit Shapes panel, you will find the Entity Type frame. Since only source type shapes can be edited, all the
type icons are unavailable.
Shape Type Frame
In the Shape Type frame (shown below), there are buttons representing all the shape
types Fidelity Pointwise
supports: Polygon, Box,
Cylinder, and Sphere.
Simply click the button to change the type for the source currently being edited.

Use the Shape Type frame to change the shape between a Polygon, a Box, a Cylinder, or a Sphere.
Mode Frame
The Mode frame provides controls to specify the current mode: Drawing, Enclosing, Translate, Rotate,
or Scale. The role of the handles and their effect on the shape being created depends on the selected mode. The different modes are defined here:
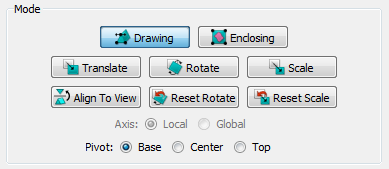
Use the Mode frame to change the role of the handles and their effect on the shape being edited. The available modes are: Drawing, Enclosing, Translate, Rotate, and Scale.
- Drawing: This mode will allow you to edit the shape extents and proportions. The Edit Shapes panel always opens in Drawing
mode. When this mode is selected, you will be able to edit the control points needed to define the shape. Refer to the list of topics shown below for
information on how to use the options available in the Shape Parameters frame depending on the type of shape being created.
- Enclosing: This mode will allow you to modify the parameters for a shape that encloses a group of selected entities. When this mode is
selected, the Enclosing Parameters frame will expand automatically. Refer to the list of topics shown below for information on how to use the
options available in the Enclosing Parameters frame.
- Translate: In this mode you will be able to drag the provided handles to translate the shape being edited in Cartesian space. In the
Axis options, select Local to translate the shape about its local coordinate system; select Global to translate it about the global
coordinate system. You can use the T keyboard shortcut to quickly switch between both coordinate systems. In the Pivot options, select
either Base, Center, or Top to place the handles at the center of the bottom face, center of the three dimensional shape, or
center of the top face respectively.
- Rotate: This mode operates essentially the same as the Translate mode. In this case, you can drag the provided handles to rotate
the shape being created about the selected rotation axis. In the Axis options, select Local to rotate the shape about a local coordinate
system; select Global to rotate it about the global coordinate system. You can use the T keyboard shortcut to quickly switch between both
coordinate systems. In the Pivot options, select either Base, Center, or Top to place the pivot point and the handles at
the center of the bottom face, center of the three dimensional shape, or center of the top face respectively. Once a rotation transformation has been
performed, you can use the Reset Rotate command to discard it and bring the shape to its original position.
- Scale: In this mode you will be able to drag the provided handles to scale the shape being created. In the Axis options,
select Local to scale the shape in the x, y, and z directions of a local coordinate system. Select Global to perform a uniform
scaling in the global coordinate system. In the Pivot options, select either Base, Center, or Top to place the
anchor point and the handles at the center of the bottom face, center of the three dimensional shape, or center of the top face respectively. Once a
scale transformation has been performed, you can use the Reset Scale command to discard it and bring the shape to its original configuration.
Note that a mouse hover over the mode buttons will produce a tooltip showing the name of the mode with one letter between parenthesis. This letter indicates
the keyboard shortcut associated with each mode. For example, if you are currently using the Drawing mode, press the keyboard T key to
switch to the Translate mode. Likewise, press the R or S keyboard keys to switch to the Rotate and Scale modes
respectively. Once in the desired mode, press the same key to alternate between the Local and Global coordinate systems.
The Align To View command aligns the local coordinate system with the current view direction. Note that you can display the axes for the local
coordinate system by selecting the Translate mode (explained above) either via the GUI or by using the T keyboard shortcut.
Enclosing Parameters, Shape Parameters, and Shape Options Frames
The contents of the Enclosing Parameters, Shape Parameters, and Shape Options frames depend on the type of shape being
created. Refer to the list of topics shown below for information on how to use the options in these frames for each
type: Polygon, Box,
Cylinder, and Sphere.
When the shape edits are complete, click OK to save it and close the panel, or click Cancel to discard the changes and close the panel.
For more information on the available Shape Types, refer to the Create, Draw Shapes command descriptions below: