Select Similar provides improved tools for selecting quilts based both on similarity with
respect to geometric properties and (optionally) quilt adjacency relationships within the
model. The Select Similar command can be activated in one of three ways: through the
Select menu, through the
Selection toolbox,
or using the shortcut S.
Expand the Selection toolbox or press the Select Similar Settings icon
(![]() ) to access
the Select Similar settings.
) to access
the Select Similar settings.
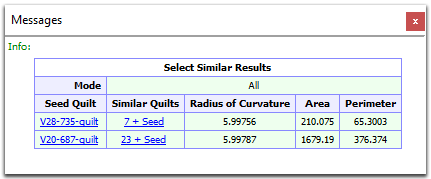
Once activated, Select Similar selects additional quilts that match the currently selected quilts, according to the Properties and Constraints specified. When the selection is complete, a table is printed to the Messages window summarizing the results. The first row, Mode, reports the mode used during the selection. The Feature Edge Angle is reported in the next row, if Retain Feature Edge was enabled for the selection. The table then summarizes the results for each seed quilt. The Seed Quilt column contains a hyperlink for re-selecting just the seed quilt. The Similar Quilts column displays the number of quilts found that were similar to the seed quilt. The hyperlink can be used to quickly re-select all similar quilts (including the seed). The remaining columns display the computed values of the seed quilt for each selected geometric property.
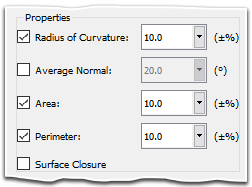
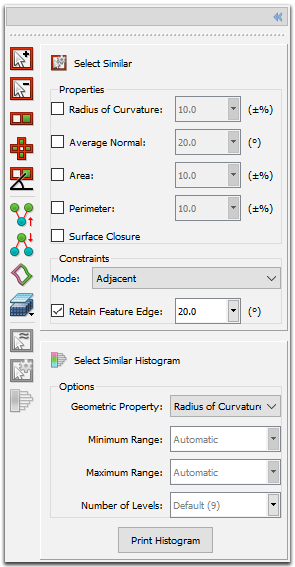
The Properties frame contains options for selecting which geometric properties are considered for similarity. Check the box to enable a property and set the corresponding tolerance appropriately. By default, all properties are unchecked. There are five properties in total:
Tip: You can select multiple properties for consideration with Select Similar. This can be helpful in narrowing your selection to only the targeted quilts. For instance, if your geometry contains many filleted surfaces of varying curvature and length, you might check both the Radius of Curvature property and either the Area or Perimeter property to target a specific set of fillet quilts.
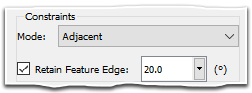
The Constraints frame contains options for further limiting the similarity selection. Mode allows you to constrain the similarity based on topological connections and has three options:
Retain Feature Edge specifies whether or not to respect feature edges when using the Adjacent and All Adjacent modes. When checked, Select Similar uses the specified turning angle to detect feature edges which the resultant selection cannot cross. Retain Feature Edge is checked by default and has a default turning angle of 20 degrees.
Select By Histogram
(![]() )
is a separate but related command to Select Similar which allows you to print a
histogram of the Select Similar geometric properties to the
Messages window. In addition to
providing useful information about the distribution of the property among all quilts (i.e. the
minimum and maximum value and the number of quilts in each level), the histogram also provides
hyperlinks that can be used to quickly select all quilts in each level.
As with Select Similar, either expand the Selection toolbox or press the
)
is a separate but related command to Select Similar which allows you to print a
histogram of the Select Similar geometric properties to the
Messages window. In addition to
providing useful information about the distribution of the property among all quilts (i.e. the
minimum and maximum value and the number of quilts in each level), the histogram also provides
hyperlinks that can be used to quickly select all quilts in each level.
As with Select Similar, either expand the Selection toolbox or press the
![]() icon to access the Select Similar Histogram settings.
icon to access the Select Similar Histogram settings.
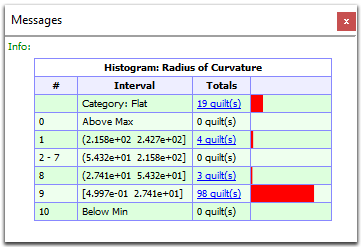
Note: If more than two adjacent levels are empty, they are combined into a single row in the histogram printed to the Messages window, as can be seen in the above image for levels 2-7.
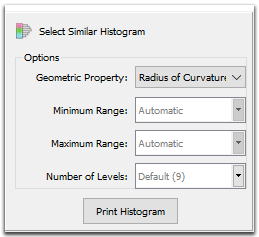
The Options frame contains all settings for Select Similar Histogram. The Geometric Property pull-down allows you to choose the geometric property for the histogram and has options of Radius of Curvature (default), Area and Perimeter. Refer to the section above for descriptions of each property.
Note: All geometric properties have two default levels in addition to the number specified by Number of Levels: Below Min and Above Max. When Minimum Range or Maximum Range are set to user defined values, any quilts that fall below the specified minimum or above the specified maximum are placed into these levels.
The Radius of Curvature property contains one extra level, Category: Flat, which contains all quilts identified as being planar.
Minimum Range and Maximum Range allow you to specify the minimum and maximum values, respectively, for the histogram. By default, both Minimum Range and Maximum Range are automatically determined (as indicated by the gray Automatic in the text field) by the algorithm as the true minimum and maximum value present in the geometry. Number of Levels specifies the number of levels to be used to subdivide the specified range and has a default value of 9 (as indicated in gray text in the text field).
Enter a new value in the text field to change the Minimum Range, Maximum
Range, or Number of Levels. Press the
![]() icon to clear the field and return to
the default setting. Press Print Histogram to print the histogram
to the Messages window.
icon to clear the field and return to
the default setting. Press Print Histogram to print the histogram
to the Messages window.