Description
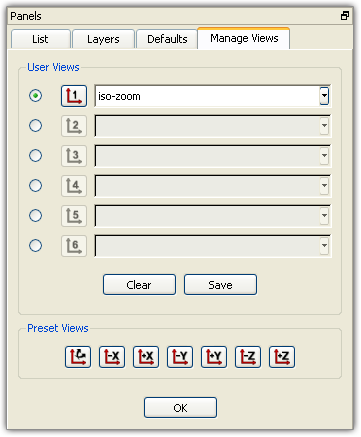
The User Views frame contains controls for managing user defined views (shown below). The upper portion of this frame holds information about the six views you can define. Each row has a radio button, a uniquely numbered view selection button (1 through 6), and a description text entry field. There are two action buttons at the bottom of this frame: Clear and Save.
The radio buttons select the user view to which the Clear and Save actions will apply. Select the radio button corresponding to the view you want to clear or save before clicking on the Clear or Save button.
Click on the numbered view selection button for the view you want to restore. The Display window will immediately show that view orientation.
Tip: User Views are a handy way to move from one zoomed in view to a zoomed in view of a different location. Save a user view either using the keyboard shortcuts Alt+1 through Alt+6 or by holding the Ctrl key and clicking on the appropriate User View toolbar button (1 through 6). Later, you can recall the view using the shortcuts Ctrl+1 through Ctrl+6 or by clicking the same User View toolbar icon.
Enter a descriptive name as desired in the corresponding text entry field of a user view. These descriptions will be displayed as tooltip text when hovering over user view icons on the View toolbar. They will also be listed in the Messages window when a user view is restored.
Note that defined views can also be saved and restored without entering the Manage Views panel. When working with your grid in the Display window, use the shortcuts Alt+1 through Alt+6 or simply press the Ctrl key and click on the appropriate User View button (1 through 6) in the View toolbar to save a user defined view. You can also use the shortcuts Ctrl+1 through Ctrl+6 or press the appropriate User View button (1 through 6) in the View toolbar to restore a user defined view.
The Preset Views frame contains buttons to recall the six principal views: +X, -X, +Y, -Y, +Z, and -Z. Click on the button corresponding to the view you want to restore, and it will immediately be set in the Display window. The Preset Views frame also contains a button for the Dynamic View. This button becomes active after performing a model manipulation (pan, zoom, or rotate) followed by use of a standard preset view, a saved user view, or either of the Zoom to Maximum/Minimum commands on the Examine, Extrema tab. This allows you to return easily to your previous orientation prior to use of one of the automatic or saved orientations.
Click on the OK button to close the Manage Views panel.